 The CAS Loader (sqlLoader)

To skip the description sections below
and go straight to Setting Up the Loader Framework, click the
Loader Setup link at the left.
Overview
The loading framework for the CAS databases
is in
the sqlLoader
product in the SciServer GitHub repo. There are several
subdirectories at the top level as listed below. All but
the admin subdirectory are to be deployed on the loadserver
machine.
- admin - contains the loader admin
web interface (Load Monitor) files. The contents of this
subdirectory should be copied to the web tree which will serve
as the loader web page. This needs to be on a Windows web
server.
- doc - contains the documentation
files for the loader, including this file.
- dts - contains the DTS (Data Transformation
Services) packages used by the loader.
- htm - contains the stored procedures
and DLL (dynamically linked library) for the HTM (Hierarchical
Triangular Mesh).
- loadadmin - contains the back
end of the admin web front end, i.e., all the files
and scripts that implement the CAS loader.
- schema - contains the schema input
(.sql) files for the CAS databases.
- vbs - contains Visual Basic scripts
(.vbs files) used by the loader.
Each of these directories has a readme
file to describe the directory contents. The prominent
subdirectories are described in further detail below.
Load Monitor or Admin Webpage (admin/ subdir)
The admin subdirectory contains the web
pages and associated files and scripts for the loader administration
web interface (the Load Monitor). This subdirectory
should be copied or moved to the web tree where the load monitor
is to be accessed from. Note that currently the admin web
pages must be installed on a Windows machine (running IIS) since
they use ASP (active server pages) technology. The security
setup is Windows authentication at the moment and this requires
that the pages be accessed also from a Windows machine. The
web-server connects to the loadsupport DB of the loadserver.
There are 4 kinds of files in this directory:
- Active Server Pages (.asp files)
that correspond to actual web pages.
- Cascading Style Sheets (.css files)
that are used by the web pages to set up the look and feel.
- Javascript (.js) files that contain
functions in jscript to perform loader admin procedures.
- Include (.inc) files that are included
in other files above.
There is a docs.asp file that contains
an overview of the loading process and framework. It is
the page linked to the "Help" link on the admin page. The img
subdirectory contains the JPG and GIF images used in the web pages.
In order to set up the admin web pages for the
SQL Loader, you need to do the following:
- Copy/move the admin subdirectory
of sqlLoader to the web tree where the admin pages will be served
from.
- Set up a virtual directory in IIS to point
to this directory.
- Modify the connection.js file (edit
with Notepad) to replace the xxx-ed out password for the
webagent user with the real password.
Loader Admin Framework (loadadmin/ subdir)
The loadadmin subdirectory is where all
the action is - it contains all the scripts that actually load
the data and update the logs. There are 2 kinds of files
here:
- Windows command scripts (.bat files)
that run the loading framework and SQL scripts.
- SQL scripts (.sql files) that contain
the SQL code to set up the loading framework and load the data.
There are two parts to the loading framework:
loadadmin and loadsupport. The loadadmin
scripts and databases control the load framework on the master.
The loadsupport scripts and DBs set up the loading on the slave
loadservers and build the ancillary framework to facilitate the loading
process, such as setting up the webagent user, setting up links between
master and slave loadservers (if applicable), setting up the HTM, and
utilities to manage units of the loading process (phase, step, task
etc.). See Fig.1 which shows the relationship
between the LoadAdmin and LoadSupport parts of the framework. Each
of the satellite or slave servers links only to the master, not to each
other. The loadsupport part of the loading works only with remote
views of the loader tables.
Load and Publish Roles
The loadadmin and loadsupport servers also have different roles
in the current distributed implementation: the loadadmin
server runs both in load and publish roles, whereas the
loadsupport servers run only in the load role. The load
role corresponds to the loading of the CSV files into the individual
component databases (one per load unit), whereas the publish role involves
the validation and transfer of the component database contents into the
publish DB for each dataset. The loading is therefore done in parallel,
and the publishing brings all the loaded components together into the
publish DB on the master server.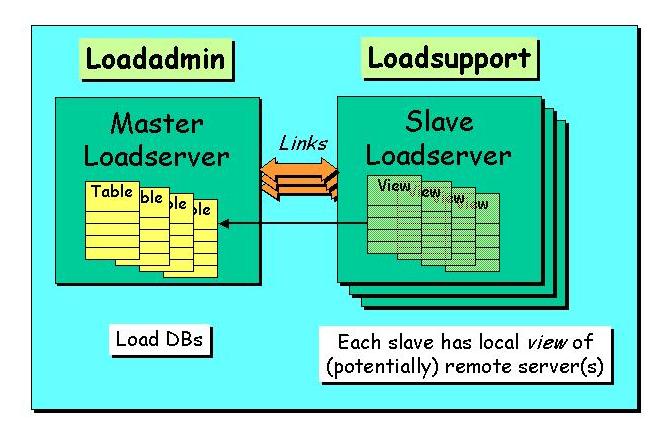
Fig 1. Schematic of relationship between the master
(loadadmin) server and the slave (loadsupport) servers.
Loader Command Scripts
- build-loadadmin.bat - This builds
the loadadmin framework on the master server. This is
to be run only once from the command line on the main
(master) loadserver machine. It takes no parameters. It
performs the following tasks:
- gets the loadserver computer name
- creates the path for the loader logs
- looks for local log.txt file and
deletes it
- checks if C:\sqldb directory exists and
creates if not - the loadadmin DBs are created there
- makes load logs readable for everybody
- sets up 2 shares - root and loadlog
- runs the following SQL scripts:
- loadadmin-build.sql
- loadadmin-schema.sql
- loadadmin-local-config.sql
- build-loadsupport.bat - This script
must be run on each of the loadservers in the configuration, including
the master. It builds the loadsupport part of the framework
on the current loadserver (which can be the master or one of the
slaves if applicable), including the loadsupport database,
the HTM, loadsupport utilities etc. Note that the set-loadsupport.bat
script must be edited before this script is run. This
script performs the following functions:
- sets the name of the master loadserver
- sets up the logging paths for this loadserver
- sets up the load-support environment
on this server
- builds the load-support DB and
schema on this server
- sets up the load-support stored procedures
and utlilities
- sets up this loadserver's role
- loader or publisher
or both: a loader only stuffs the data in the databases, but does
not run the validation and publish steps
- sets up the HTM
Loader SQL Scripts
- loadadmin-build.sql - This script
performs the following functions:
- deletes the existing loadadmin DB if
any
- turns on the trace flag 1807 - this
is a secret Windows flag that allows us to mount remote DBs
- sets a bunch of DB options
- turns autoshrink off - this is very important
otherwise the performance bogs down when autoshrink tasks run
in the background
- loadadmin-schema.sql - This performs
the following functions:
- creates Task and Step tables in the loadadmin
DB
- inserts NULL task and step - this is
necessary so we can assign system errors if everything fails
- creates NextStep table - this drives
the sequence of loading by specifying what are the procedures
for the next step
- creates ServerState table - this allows
us to stop the server so that processing is stopped
- creates Constants table and put it in
all the paths
- gets server name from global variable
(e.g. sdssad2) - Note: SQL name for the server must be the same
as the Windows name
- loadadmin-local-config.sql - This
script must be adapted for the local configuration
before running the loader. This is one of the setup steps
listed in the Setup section. This script
performs the following functions:
- sets up the paths for the CSV files
- sets up backup paths
- sets up the loadagent user and
domain so that the SQL Agent can be started up
- loadsupport-build.sql - This script
needs to be edited to update the domain account names explicitly.
It does the following:
- creates a "webagent" user account which
is used by the load monitor web interface to connect to the loadserver(s)
and run loader tasks
- make sure that webagent is a sysadmin
on the loadserver
- make sure only the master loadserver
does this
- in the future, this script will likely
be reorganized to deal differently with master and slave loadservers
- loadsupport-schema.sql - Creates
a single table with a single row which is the name of this loadserver.
We need to do it this way to allow easy scripted access
with SQL.
- loadsupport-link.sql - This script
sets up the link between the master and slave server for this
slave. Specifically, it does the following:
- creates a 2-way link-server relationship
between this slave server and the master server
- sets up all the views
- enables remote transactions
- loadsupport-sp.sql - Sets up the
stored procedures for loading from this server. These include:
- constructors for phase, step,
and task
- start/end steps - this is done only on
the loadserver
- kill task, ensuring that:
- log records are kept
- files are cleaned up
- DB is deleted only when the same task
is re-submitted (with new taskID)
- loadsupport-utils.sql - This is
the package that contains all the pre-load utilities.
- loadsupport-steps.sql - This controls
the high-level steps. Each step has a stored procedure
with the name "sp<name-of-step>step" associated
with it - which is the meat of the step's logic - and a "sp<name-of-step>"
procedure that is a wrapper that calls the sp<name-of-step>step
procedure.
- loadsupport-show.sql - This contains
web procedures for the load monitor admin website which show
various entities on the web pages.
Task Management
This section describes the way tasks are handled
in the loader framework. The basic unit of loading at the
top level is a task. Tasks are further divided into
steps, which are in turn subdivided into phases.
Steps have a well-defined start and end, whereas
a phase does not have a start or end associated with it. A step
also has a stored procedure associated with it. The tasks display ("Active
Tasks" or "All Tasks") shows the taskid, the stepid and the phaseid, hence
the granularity of the task display is a single phase.
Creating a New Task
The New Task link creates
a new loading task. You can select the following parameters of
the task:
- dataset - select between TEST, DR1, DR1C
or DR2; this is the release that the loading is being done for,
with TEST being used for testing.
- export type - the database that this
is being exported to: BEST, RUNS of TARGET for an imaging load,
PLATES for spectro, TILES for tiling, and a special target FINISH
for the last step that ties up all the loose ends in publishing a
complete CAS.
- xroot - this is the root of the exported
CSV directory tree on the LINUX side (Samba-mounted), in Windows
notation (\\hostname\directory\subdir...).
- xid - the identifier of this load unit,
i.e. the chunk, plates or tiles that need to be loaded. This
is basically the name of the subdirectory in the CSV directory tree that contains the runs,
plates or tiles that are to be loaded.
- user - the username of the person who
is running this load task.
- comment - an optional comment to describe
the purpose or content of this load.
Killing a Task
If you are sure something is wrong with a task and
want to kill it, you can do so by clicking on the last column of
the task display in the tasks table. You will be prompted for confirmation.
The loader cleans up when a task is killed, but some files and
especially temp DBs created will not be deleted until the same task
(with the same parameters but of course a different taskID) is run
again.
SQL Schema Files (schema/ subdir)
The schema creation scripts for the CAS databases
are here. There are 5 subdirectories at this level:
- csv - contains CSV (comma-separated
values) outputs from the documentation generation scripts
- doc - the documentation files (web
docs etc.) are here
- etc - miscellaneous SQL script files
are here, for housekeeping and utility schema-related functions
- log - the weblogging stuff is here
- sql - this is the main subdirectory
containing the schema files. The various schema tables,
views, stored procedures and functions are created by the SQL scripts
in this subdirectory. The following files are here:
- boundary.sql - Creates the tables and funtions
related to boundaries and polygons
- constantSupport.sql - Creates the support
functions for various constants and enumerated types
- dataConstants.sql - Sets the values of
the constants and enumerated types
- metadataTables.sql - Creates the tables
that describe the data tables
- myTimeX.sql - Contains scripts for performance
measurements
- nearFunctions.sql - Creates the various
functions that find nearby objects
- photoTables.sql - Creates the imaging
(photo) tables
- spBackup.sql - Creates stored procedures
to back up databases
- spectroTables.sql - Creates the spectro
and tiling tables
- spFinish.sql - Contains the stored procedures
for the Finish step in the loading/publishing
- spGrantAccess.sql - Creates the stored
procedure that sets the privileges correctly for users after
databases are loaded
- spHTMmaster.sql - Creates the stored procedures
to install HTM into the master database
- spHTM.sql - Creates the stored procedures
to install HTM into other DBs
- spManageIndices.sql - Creates the stored
procedures for managing the index creation
- spPublish.sql - Contains the stored procedures
for the Publish step in the loading/publishing
- spSetValues.sql - Contains the stored procedure
that sets and updates column values after the bulk loading
- spValidate.sql - Contains the stored procedures
for the Validate step in the loading/publishing
- views.sql - Defines and creates the various
views on the data tables
- webSupport.sql - Creates the stored procedures
to support the web (HTTP) interfaces to the DBs, including those
needed to execute SQL queries submitted via the skyServer and the
sdssQA
- zoomTables.sql - Creates the schema for
the Zoom-related tables
Setting Up SQL Loader Framework
To summarize, the following steps must be performed
to set up and install the sqlLoader so that data can be loaded into
the databases. Most of these steps (#1-9) are things that you
should typically only have to do once, the first time you set
up the loader. If the loadserver has already been configured,
proceed directly to step 10.
- Make sure that the SQL Server security on
the master loadserver (loadadmin) machine is mixed security,
i.e. not Windows Only. This is necessary for the webagent user
to be able to connect to the loadadmin server. To check and change
the security, bring up Enterprise Manager, select the local SQL Server
group, and go to the Tools menu and select "SQL Server Configuration Properties...".
Go to the Security screen and make sure that "SQL Server and Windows"
authentication is selected instead of "Windows Only".
- Make sure that the SQL Server Agent is running
on the master loadserver (loadadmin)
- On the master loadserver machine, check
out a copy of the sqlLoader module in the C:\ drive.
- Make sure that the tempDB properties are set correctly.
In Enterprise Manager under the Databases tab, select tempDB
and then select Taskpad from the View menu. This will show the
DB properties at a galance. You need to check/set the following:
- The data file for the DB on the D: drive needs
to be set to grow automatically. To set this:
- Move the mouse over the little yellow Database button
at the top and select Database Properties.
- Once the window comes up, select the Data Files tab.
- Click on the data file entry for the D: drive (d:\sql_db\...).
- Click on the "Automatically grow file" button to
check it (turn it on) if it isn't checked already.
- Click on the "By Percent" button below it and enter
25 in the value window. The growth should be at least 10%, preferably
25% for best performance.
- Make sure that the data file for the DB on the C:
drive is not set to grow automatically. To set this:
- In the Data Files tab, click on the data file entry
for the C: drive (c:\sql_db\...).
- Click on the "Automatically grow file" button to
turn it OFF, only if it is checked.
- The size of the data file should be at least 10GB (10000MB),
preferably 20GB (20000MB) if there is room to spare. You can
only increase the size of the data files from the initial size (you
cannot decrease the size below the initial size the DB was created with).
To increase the size,
- Click on the name of the data file name (probably
D:\sql_db\tempdb_data*.mdf, or .ndf) - this will be the largest file.
- Click on the Size column for that file, and enter
the new size in MD (10000 or 20000).
Once you are done, press the Ok button at the bottom to apply
the changes. It will take a while to increase the size of the
data file (few minutes to half hour). - Set up
the load monitor web interface on a Windows machine (web server
running IIS):
- Copy/move the admin subdirectory
of sqlLoader to the web tree where the admin pages will be served
from.
- Set up a virtual directory in IIS to
point to this directory.
- Modify the connection.js file
(edit with Notepad) in the admin directory to replace the xxx-ed
out password for the webagent user with the real
password, and change the Data Source to point to the master loadserver
machine.
- Tweak the loadadmin/loadadmin-local-config.sql
file as per the local configuration parameters (see Loader Admin Framework section above). Make
sure that all the directory paths that are specified in this file actually
exist! For the backup directory path, also make sure that
the Sharing (not NTFS Security) privileges for the backup
directory allow Full Control for Everyone.
- Create a share for the master sqlLoader
directory on the web server and the slave servers.
- Edit loadadmin/set-loadserver.bat
to set the name of the master loadserver machine.
- Edit the loadadmin/loadsupport-build.sql
file to update the domain account names, if necessary.
- If this is not the first time, and a previous loadadmin/loadsupport
environment exists on this machine, delete it by doing the following:
- Kill any tasks that may be running in the previous
Load Monitor.
- In Enterprise Manager, go to the local SQL Server
Group and open the Databases tab. Then delete each of he following
databases by right-clicking the mouse on the database and selecting
Delete to delete it:
- The publish DBs, called <export type><dataset>,
e.g., BESTTEST and TARGTEST or BESTDR1 and TARGDR1
- Any temporary load DBs <dataset>_<export
type><xid>, e.g. TEST_BEST1_35_471938
- The loadadmin DB.
- The loadsupport DB.
- Run the following scripts from a command shell
(Start->Run...->cmd). Note that step 4 should be run on each
loadserver in the configuration (including the master), each of which
will have the sqlLoader directory shared.
- C:
Make sure you are on the C: drive.
- cd C:\sqlLoader\loadadmin
Go to the loadadmin subdirectory in the loader.
- build-loadadmin.bat
This will create the loadadmin environment and DB.
- build-loadsupport.bat -LP (on loadadmin/master)
build-loadsupport.bat -L (on each loadserver/slave
other than master)
Run this on each loadserver in the configuration. On
all but the master (loadadmin) server, the sqlLoader directory is shared.
This will create the loadsupport environment and DB and set this
loadserver's role to both LOAD and PUBLISH. If the last
message from running the above 2 steps says "Access denied..." rather
than "1 file(s) moved", this means that the log file could not be moved
to the loadlog directory. You will need to right-click on the C:\loadlog
directory, select Properties or Sharing and Security and go to the
Sharing tab. In the Sharing permissions screen, select Everyone
and turn on Full Control. After doing this, you will have to restart
the setup at step 9 above.
- For a BEST and TARGET load (public datasets) run
the command:
- build-publish-db.bat <dataset>
<db-data-size> <db-logsize>
For RUNS loading, run the following command:- build-runs-db.bat <dataset>
<db-data-size> <db-logsize>
These scripts should be run on the master
only. The build-publish-dbs.bat script
will automatically create publish DBs for the BEST and TARGET skyversions
for each dataset. This will take some time to run for multi-GB
sizes. The sizes you pick for the DB and log files should
be approximately:
- <db-data-size> = the total
size of the data (CSV files) that you want to load + 50%,
in MB.
- <db-log-size> = at least
50% of the CSV data size, in MB. e.g.,
- build-publish-db.bat TEST 20000 10000
(for BEST/TARGET loader)
- build-runs-db.bat TEST 20000 10000
(for RUNS loader)
These are just the initial sizes - SQL Server will
expand the file sizes as needed, but this comes at a performance
cost so it's better to allocate enough space to begin with. Note that
there are analogous scripts for BEST and TARGET DBs as for RUNS:
build-best-db.bat and build-target-db.bat, but you should not need to run them
separately.
Running the Loader
The loading is launched and controlled from the
Load Monitor web interface. A New Task must
be created and launched for each unit of the loading, whether
it is an imaging, spectro or tiling load. The unit for each
type of loading as as follows:
- imaging - a chunk, as resolved by
OpDB, and corresponding to a subdirectory under $chunkRoot/inchunk_*/,
e.g. stripe35_mu629735_1.
- spectro - a spectro run, i.e. a
sequence of plates that is considered to be part of the current
load because it corresponds to the imaging unit last loaded (as
listed in the corresponding spPlatesToLoad*.par file).
In the CSV directory tree, there
is separate subdirectory under spCSV/plates/ for each such run. The
name of the directory is constructed from the date+time (e.g., 2003-01-28-1800)
of the spectro run to avoid collision with a different run that may
be processed in the same timeframe.
- tiling - a tileRun, e.g. chunk15.
Monitoring the Load
Selecting the Active Tasks
or All Tasks links in the Load Monitor shows
you the tasks that are currently running. The color-coding for
the task status is shown below the task table. For each task, the
taskid, the stepid and the phase number are shown, along with the
name of the task and step that is currently being executed. The task
display is updated once every minute.
For each task, you can select the Steps, Files or Log links to look at
the steps, files and phases logged (completed) for that task.
The PRELOAD step of a loading task usually takes the longest time, as
the CSV files are loaded into the load-DB in this step. The largest
of the CSV files for each run - the PhotoObj*.csv files - each will
take 10-15 mins each to load, and the preload step for one imaging
chunk can take more than an hour to complete. You can monitor the progress
of the preload step by selecting the Files
display for that task.
Running FINISH step by step manually
Currently the FINISH part of the loading can be run step by step, but only if
manually invoked from the SQL QA or SQL Agent.
The command to execute shd be:
EXEC spFinishStep <taskid>, <stepid>[, <step>[, <mode> ] ]
(both <step> and <mode> are optional)
where <taskid> = 1, 2 or 3 for BEST, TARG or RUNS resp.,
<stepid> = 1,
<step> = one of the following:
'ALL', (default)
'dropIndices',
'syncSchema',
'loadPhotoTag',
'buildPrimaryKeys',
'buildIndices',
'buildForeignKeys',
'computeNeighbors',
'buildMatchTables',
'regionsSectorsWedges',
'loadScienceTables',
'syncSpectro',
'buildFinishIndices',
'matchTargetBest',
'loadPatches'
<mode> = 'resume' (default) or some other string (not 'resume')
The resume mode means keep going with the FINISH step after executing the
first step indicated, otherwise it stops after that step.
So in most cases, you will be using something like:
EXEC spFinishStep 1, 1, 'buildIndices'
whereas
EXEC spFinishStep 1, 1
is equivalent to:
EXEC spFinishStep 1, 1, 'ALL', 'resume'
(don't bother to specify the 4th parameter because you want resume mode).
The WebLog DB
The WebLog database maintains a record of every query submitted
to the DB server via the SkyServer web interface. All skyserver
queries are submitted to the server through the execution of the spExecuteSQL
stored procedure. However, the task of getting the query information
from the web server to the DB server is non-trivial (because Active
Directory is not set up), and ensuring its success requires that the
following steps be performed.
- Set up the web logging configuration in the IIS running on
the web server:
- Right-click on My Computer and select Manage
- Open the "Services and Applications" tab
- Open the "Internet Information Services" (IIS) tab
- Select the "Default Web Site" and right-click on it. Select
Properties.
- Go to the Web Site screen
- Make sure that "Enable Logging" is checked
- In the "Active Log Format" window, make sure that "W3C
Extended Log File Format" is selected (not "ODBC logging")
- Click on Properties next to the log format window
- Select Daily logging
- Set the log file directory to %WinDir%\System32\LogFiles
- Open the "Extended Properties" tab, and select the following
items to be logged:
- Date
- Time
- Client IP Address
- User Name
- Server IP Address
- Server Port
- URI Stem
- URI Query
- Protocol Status
- User Agent
- Once a month, move all the files in the LogFiles folder to
a new folder to save them.
- On the DB server, open Enterprise Manager (EM). The
SQL logging is driven off of the existence of the WebLog DB. A check
for the existence of this DB is built into the spExecuteSQL stored procedure.
This procedure inserts the query submitted by the user into the
Weblog tables. The tables in the WebLog DB are:
- The WebLog..WebLog table is the DTS (Data Tranformation
Services) copy of the web logs from the web server.
- The WebLog..TrafficBase keeps the yearly, monthly, daily
distillation of the logs, i.e. the traffic on the webserver.
- The WebLog tables SqlStatementLog and SqlPerformanceLog
get populated by spExecuteSQL.
- The SQL Agent should have one job to merge new weblogs. The
job should be in the DB Maintenance category. To create this job,
the procedure is as follows:
- Open the Management tab in EM
- Open the SQL Server Agent tab under Management
- Right-click on Jobs and select New Job ...
- Type in a name for the job, e.g., "Merge in new weblogs"
- Make sure Enabled is checked
- Select Database Maintenance in the Category window
- Make the local DB admin the owner of the task
- Type in a description, e.g. "Copies last 2 days of logs
into skyserver weblog database"
- Next, open the Steps tab and select New... to create a new
step
- Type in a name for the step, e.g. "Do the merge"
- Select WebLog as the database in the Database window
- In the Command window, type in "EXEC WebLogMerge"
- Open the Advanced tab within Steps and make sure that the
On Success action is "Quit the job reporting success", and On Failure
action is "Quit the job reporting failure"; click Ok to return to main
Steps screen
- Open the Schedules tab and select New Schedule... to create
a new schedule
- Select Recurring, and create a Daily schedule to run the
job every hour from 1 am until 11:59:59pm.
- Save all changes by selecting Ok on all screens. The
job should appear in the Jobs display now.
This job invokes the WebLogMerge procedure, which appends the weblog
from the last 2 days each time. This in turn calls UpdateWebLog,
which is where all the work is really done. Both these procedures
are in sqlLoader/schema/log/webLogDBCreate.sql, which is also where the
WebLog DB creation code is. The way the weblog appending is done is:
- The webserver weblog directory is remote-mounted on the
DB server
- We manually delete the last 2 days of logs before moving
the new ones in
- This is scheduled (in the SQL Agent job scheduling) to
happen every hour on the hour.
- The notification is sent to the Windows Applications Log
if it fails
- The DTS script that transfers the weblog from the webserver
to the DB server is in sqlLoader/schema/log/bcpWebLog.js (JavaScript).
This calls the xcopyWebLogFromYesterday.js script that is also in
the same directory.
To Do:
- Put the webserver side of weblogging config in the installation
scripts/procedures.
- Schedule task(s) to clean up weblog directory on webserver
every so often. Currently this has to be done manually.
Updating Metadata and Documentation Tables
The schema/csv subdirectory contains the files that load
the content for the associated metadata tables. The files are all SQL
scripts that can be run in the SQL QA. However, it is not necessary to run
them manually, since the spLoadMetaData procedure in the BEST
database can be invoked to run them all. This section lists the files
and the steps necessary to load or update the metadata into the BEST DB.
Metadata Loading Scripts
The metadata tables in the BEST database and their corresponding loading
scripts and purpose are listed in the table below. The loading scripts are
generated (by the Visual Basic scripts in vbs subdirectory)
from the schema (.sql) files in the schema/sql subdirectory.
| DB Table | Loading script (in schema/csv) | Purpose/content |
| DBObjects | loaddbobjects.sql | Name and description of every user Table, View, Function and Stored Procedure in the database. |
| DBColumns | loaddbcolumns.sql | Name and description of every Column in every user Table in the database. |
| DBViewCols | loaddbviewcols.sql | Name and descriptio of every Column in every user View in the database. |
| Dependency | loaddependency.sql | The dependency chart for functions and procedures that gives the parent and child names for each such object. |
| Inventory | loadinventory.sql | A list of every schema object ordered by the file that contains it. |
| History | loadhistory.sql | Extracts the change history from each schema file and shows them in chronological order. |
Documentation Files
The documentation tables Glossary, Algorithm and
TableDesc in the BEST database hold the content for the Glossary,
Algorithms and Table Description pages in the SkyServer Help
menu. These pages are auto-generated from these tables on the
fly. To modify the content of these Help pages, you need to make the changes
in the original context .txt files in the schema/doc subdirectory.
The mappings between the SkyServer Help pages, the corresponding DB tables,
the content files and loading scripts are shown in the table below.
| SkyServer Help Page | DB Table | Content file (in schema/doc) | Loading script (in schema/csv) |
| Glossary | Glossary | glossary.txt | loadglossary.sql |
| Algorithms | Algorithm | algorithm.txt | loadalgorithm.sql |
| Table Descriptions | TableDesc | tabledesc.txt | loadtabledesc.sql |
Loading Metadata and Documentation into BEST DB
The following steps are necessary in order to load or update these metadata and
documentation tables:
(NOTE: If you are running the spSyncSchema stored procedure,
you do not need to execute the following steps because spSyncSchema
runs all of them after running the schema synchronization scripts.)
- Run a command shell (Start->Run-(cmd)) on the host that has
the sqlLoader installed (loadadmin server).
- In the sqlLoader/vbs directory, run the runAll.bat
script and it will generate each of the .sql files listed above
into the schema/csv subdirectory.
- Open a SQL Query Analyzer in the BEST database for that release
(e.g. BESTDR3) and run the following command:
- EXEC spLoadMetaData 0,0,'C:\sqlLoader\schema\csv\'
where the first 2 parameters (taskid,stepid) are set to 0, and
C:\sqlLoader is the location of the sqlLoader directory in
which the runAll.bat script was run in step 2. Remember the last
'\' at the end of the sqlLoader path, otherwise it won't work.
Setting Up SkyServer Web Interface
The SkyServer web pages can be pointed
to the newly published databases as follows:
- Create the web interface directory on the webserver - On
the webserver machine that is running IIS, install the SkyServer web tree
under the C:\skyserver directory.
There will be one copy of the web interface for each access type that this
webserver serves. There are 3 types of access possible:
- collab - this is restricted access for the SDSS collaboration
only; it is a no-frills interface that connects to private SDSS data.
- astro - public access to public data, but with a no-frills
interface that includes educational content.
- public - public access to public data with all the educational
and public information content and fancy interface.
The web tree for each type of access is identical, but one file is modified
at the top level to set the site parameters and access level (see step 2).
The SkyServer web tree is in the CVS skyServer product. Check
the desired (tagged) version of the skyServer product out of CVS as follows:
- > cvs co -r <tag> skyServer
This will check out the version tagged with the given tag into the directory.
This needs to be a tagged checkout rather than an export
so that changes from CVS can be applied to each web tree using the CVS update
command, e.g.,
- > cd C:\skyserver\collab.dr3
- > cvs up -r v3_5
in order to make bug fixes and other updates. Rename the newly created
"skyServer" sub-directory under C:\skyserver according to the convention
"<access-type>.<release>", e.g. C:\skyserver\collab.dr3\, or
C:\skyserver\public.dr3\, etc., so that it is easy to tell the function and
release date of a particular skyserver site. The virtual directory (URL)
for the collaboration CAS should be pointed to the
C:\skyserver\collab.<release> directory (i.e., the
C:\skyServer\collab.dr3 directory in the above example), and similarly the
public site should be pointed to the C:\skyServer\public.<release>
directory. A similar convention should be followed for an astro site if
necessary.
- Set up the site parameters in the globals.inc
file - To point the skyserver website to the correct database server
and set up all the other parameters like the access level etc., you need
to modify a single file at the top level of the web interface directory that
you created in step 1 - the globals.inc include file. Note that the CVS
export of skyServer will contain a globals.inc.cvs file - do not
modify this file, it is just the template for globals.inc that is checked
into CVS. Copy the file to a new file called globals.inc (no
.cvs extension). Open this file in NotePad or your favorite
editor. There are comments (instructions) in the file that describe
what needs to be set. This includes the following parameters:
- Access level - the access variable controls the site
look and feel, the timeouts, and the content that is displayed for different
classes of users.
- Release - The name of this release, e.g. DR1, DR2 etc. is
stored in the release variable. This is used in page titles,
default database name (BESTDR1, TARGDR2) as stored in the database
variable (next line in file, you don't need to change this).
- Connection to the database server - Set the userid,
userpwd, and server variables to control the access
to the database server. The userid is "test" for the web user that accesses
the database. The userid and password are usually set xxx-ed out in
CVS for security purposes. Replace the x's by the correct userid and password
for the web user. Also on the next line, set the server name to the
name of the machine that the databases reside on.
- Set the URLs for educational services and tools - the rest
of the file contains URL settings for various tools and services. The
astroCAS and collabCAS URLs are the links to the corresponding
CAS for the current release. The wsGetJpegurl and wdCutOut
URLs are for the image cutout service.
- Create a virtual directory if necessary - Next you
need to create a virtual directory corresponding to the URL that will point
to this site, if it doesn't already exist. Usually, the collab site
URL is the "collab" virtual directory under the default web site (e.g.
http://skyserver2.fnal.gov/collab/), similarly for the public and astro
sites. If the virtual directory corresponding to the URL already exists,
just make sure it points to the correct Windows directory (e.g. C:\skyserver\collab.02-25-2004).
[To set up or check a virtual directory, right-click on "My Computer"
and select "Manage". Open the Services and Applications tab and then
the Internet Information Services (IIS) tab. Then open the Default
Web Site tab. If "collab" or "public" doesnt exist under it, right-click
on Default Web Site and select New Virtual Directory. Create the new
Virtual directory and set C:\skyServer\collab (or public) as its home directory.
If the collab or public virtual directory already exists, right-click
on it and view its Properties, and make sure its home directory is
set to the correct one.]
- Update the SiteConstants table - Part of the SiteConstants table
is updated automatically, but the WebServerURL and DataServerURL values should
be updated to reflect the CAS and DAS URLs that this DB server is linked
to. The underlying assumption here is that each DB server is serving
a unique SkyServer site, which is not always true. In case the DB server
is serving more than one SkyServer site, you can just set the WebServerURL
to one of them - the most stable one. Remember to include the "en/"
at the end of the CAS URL. These URLs are used by functions like fGetUrlNavExp
and fGetUrlFits... to build URLs for image cutouts and FITs files (on
the DAS). The URLs can be updated with commands like:
UPDATE SiteConstants SET
value='http://skyserver2.fnal.gov/dr2/en/'
WHERE name='WebServerURL'
UPDATE SiteConstants SET value='http://das.sdss.org/dr2/data/'
WHERE name='DataServerURL'
- Set up web access user on DB server - If the DB server is
new or the databases have been copied to it from somewhere else, you will
need to set up the web access user on it ("test" user). Open a Query
Analyzer window (on master or BEST DB) on the DB server. Enter the
following commands in the QA window (first command only necessary if no
login exists for "test", you can check in Security->Logins):
EXEC sp_addlogin 'test', '<pwd>', 'master'
{<pwd> = test's password}
USE BEST<release>
EXEC sp_change_users_login N'UPDATE_ONE', N'test', N'test'
EXEC spGrantAccess 'U', 'test'
USE TARG<release>
EXEC sp_change_users_login N'UPDATE_ONE', N'test', N'test'
EXEC spGrantAccess 'U', 'test'
USE master
GRANT EXECUTE ON [dbo].xp_varbintohexstr to test
This should set up the web access (and take care of orphaned users if you
copied the DB from elsewhere).
To switch the database server that a particular skyserver site points
to, perform step 2.3 to edit the globals.inc file and set the server name.
Troubleshooting
- Loading stops in CHK (first) step:
- The CSV directory tree where the CSV input
files are nay not be accessible (not samba-mounted or privileges
lacking).
- Loading stops in BLD step with FRAMEWORK_ERROR:
- The loadadmin/vbs/csvrobot.vbs file
may not have the loadserver name set correctly in it's connection
string. Look for the 'Connect "Server=..." ' line and make
sure Server is set to the loadserver (loadadmin) name.
- The backup directory may not be accessible
due permissions or share security not being set right. Look
at the Log for messages about the backup directory and check if
the sharing/security allows full control for all users
on the network (or at least the mssql user which the loadserver
connects as.
- The CHK step log displays a WARNING status
for the zoom files indicating that the number of zoom files
in the CSV directories is less than what the loader expects.
- Some or all the zoom files for one or more
camCols may be missing. Sometimes the fpC* (corrected frame)
files for some fields are legitimately missing. However in this
case there need to be links instead to zoom files from a different
run or skyVersion. A more serious problem may be that the zooms
did not get genrated from the FITS fpC files because of an
error in the fits2jpeg code or the pipeline code that runs it.
This can be due to a problem (such as corruption) with the source
FITS files.
- If this warning in the CHK step is ignored,
eventually the loader will stop with an error in the PRELOAD
step (in the File Load phase). While this may seem harsh, making
the loader tolerant to missing zoom files would be dangerous because
real problems such as corruption in the FITS files could go
undetected, and frames with missing zooms would get loaded.
- Loading seems to be stalled at the end
of a step, and the next step will not start:
- The SQL Server Agent may not be running.
In Enterprise Manager, open the Management Tab and right-click
on SQL Server Agent and select Start to restart the agent.
- The SQL Agent is running but not picking up new jobs.
You may need to stop and restart the LOAD or PUB job (depending
on which task is stalled and where). Do this by right-clicking
on the job in the Jobs screen and selecting first Stop, then Start.
- Loading seems to be stalled in the middle
of the PRELOAD step
- This usually indicates a problem with loading
one of the files, so looking at the Files table is more informative.
- If the loading is stalled after the file
load phase, this may still be due to a problem with loading
one of the files, because sometimes the problem manifests itself
in a later phase.
- Corruption of the source CSV file(s)
- This is actually a special case of the previous
problem, but is more insidious and serious so deserves separate
mention. The problem will manifest itself as a WARNING during the
loading of the relevant file, and the message will indicate that
the number of lines in the file, i.e., the expected number
of rows, is different (almost always more) than the
actual number of rows loaded.
- Debugging a corruption problem is not easy,
especially if it occurs (as it almost always does) in the largest
PhotoObjAll CSV files. The first step in such cases is to look
in the CSV generation logs (log files written by the sqlFits2Csv
code) for warnings or errors. Next you can narrow the problem to
a specific run within the stripe in which it occurs, by querying
the temporary load DB for the number of lines (SELECT count(*)
FROM PhotoObjAll WHERE run=xxx) and comparing the count with
the number of lines in the corresponding CSV files. After that,
you can measure the length of PhotoObjAll lines in the CSV files
for that run by counting the commas on each line with a PERL script.
To-do List
- Add tiling validation
- Add target->best matching (setting bestObjID)
- Integrate read-only admin
web tree (loadstatus) into CVS
Ani R. Thakar,
Last Modified: June 8, 2005.